2m x 2m (6.5'x6.5') booth set up ideas for fairs / trade show / event
To set up a small booth at a trade show or exhibition, you need to plan carefully and use the limited space. Whether you're a seasoned exhibitor or a newcomer to the trade show scene, creating an efficient and visually appealing booth layout is key to attracting visitors and showcasing your products or services. In this blog post, we'll explore tips on how to set up display stands, a checkout counter, and tables effectively within a 2m x 2m (6.5'x6.5') booth space.
Ok, so how to layout a booth 2m x 2m (6.5’x6.5’) with shelves, a checkout counter or tables?
Wooden Shelvings
Display shelvings play a crucial role in attracting attention and showcasing your products effectively. Here are some tips for selecting and arranging shelving units in a small booth.
Choose lightweight stands that don't overwhelm the booth. Collapsible or modular stands can be a great choice as they are easy to transport and assemble.
Maximize vertical space by using tall, freestanding display stands or shelving units. This allows you to showcase products at different heights, making the most of the limited floor space.
Here are three great ideas to make the most out of your 2m x 2m (6.5' x 6.5') booth space with 2 shelving units.
Place your display shelving at the back of your booth to form a back wall. This will create a sleek and inviting backdrop filled with your amazing products, while also leaving plenty of room in front for tables or a checkout counter.

Utilize the corner space and turn it into an eye-catching booth. Put one shelving unit against the wall and the other on the side wall for a unique layout.

Consider setting the both shelving units on the side walls to separate your booth from the neighbor's, allowing customers to easily enter your space and explore what you have to offer.

No matter which option you choose, with a little creativity and these three simple steps, you'll have a booth that stands out and gets the attention it deserves!
Wooden Checkout Counter
Even in a small booth, it's essential to have a designated area for transactions and customer inquiries. Here's how you can set up a functional and compact checkout counter.
Choose a small and streamlined checkout counter that doesn't take up excessive space. Look for one with built-in storage or shelves to store supplies and promotional materials efficiently.
Place the checkout counter at a visible but unobtrusive location within the booth. Ideally, it should be easily accessible for both visitors and staff.
If space allows, provide a stool or chair for staff members to sit comfortably while attending to customers. This also adds a welcoming touch to the booth.
Discover the top 2 layout options for checkout counters in your booth
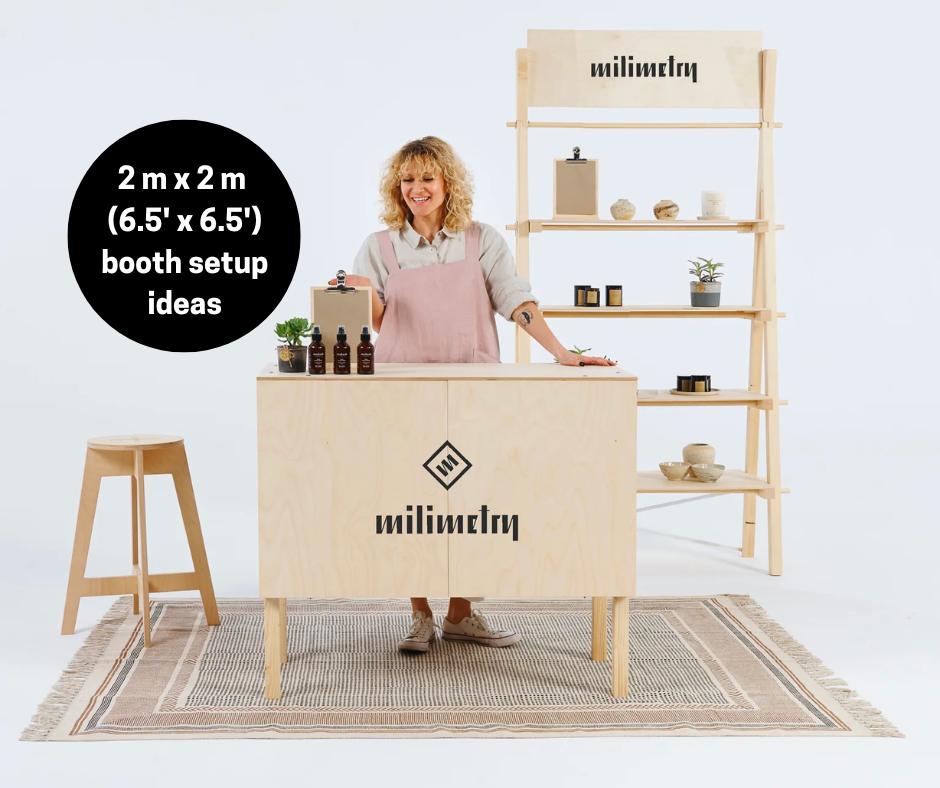
The checkout counter can be placed at the front of the booth or at the back. In first case it is the vendor who serves the products, this setup will work well for businesses based on product tasting, such as cosmetics or preserves. At the back, products can be placed on shelving and samples can be placed on the counter for testing.

When you have a business where consumers themselves want to touch and see the product it is better to set up the counter at the back and invite visitors to inside the booth. Such an arrangement will work well if you sell ceramics, candles, artwork.

Wooden Tables
Tables serve multiple purposes in a booth, from product displays to engaging with visitors. Consider using folding tables, which can be easily stored or reconfigured as needed. By using 2 nesting tables, you can cascade the products, which looks more inviting. It is also useful: part of the smaller table can be hidden under the larger table so you can adjust the floor space they use.
Dedicate specific areas of the table for interactive experiences, such as product demonstrations or tablet presentations. This encourages visitors to engage with your offerings.
Three concepts to maximize your space with two display tables
One straightforward approach is setting up the table at the front of your booth. It serves a dual purpose, allowing you to create captivating cascading displays or utilize it as a convenient checkout counter.

Ideal for corner booths, the table set offers remarkable functionality. In this setup, the larger table seamlessly transforms into a counter, ensuring smooth transactions, while the smaller table takes center stage as the perfect platform to showcase your products.

Just like the counter, the tables can be positioned against the booth wall, creating an inviting space for consumers. For businesses where customers prefer a hands-on experience, positioning the counter at the back and inviting visitors inside the booth proves to be advantageous. The accompanying photo showcases an elegant cascade display on the tables, capturing attention and generating interest. This arrangement proves especially effective for businesses specializing in ceramics, candles, artwork, and other tangible products.

Small booth can be arranged like a small boutique
Setting up a booth with limited space requires thoughtful planning and careful selection of display stands, a checkout counter, and tables. By strategically arranging these elements and optimizing the flow, you can create an inviting and functional booth that maximizes visitor engagement. Remember to tailor your setup to align with your brand identity and objectives, ensuring your products or services take center stage while making efficient use of the available space.
In these booth designs, we used:


